CNC machines are expensive tools. I managed to build a cheap 2 dimensional foam cutting CNC machine and wanted to inspire others to experiment with building machines of their own. I also want to say that I started my CNC machine build process with no upfront thought, which in hindsight was not a good idea.
I decided that I wanted to build a CNC machine completely by accident. I was playing around with a piece of nichrome wire, attached to a power supply, and using it to cut paper and then styrofoam. I am not much of an artist, so the things that I was able to cut by hand looked pretty bad. I got the idea that if a computer could control the hot wire cutter, then I could program the computer to cut intricate and accurate shapes. I did not realize at the time that what I really wanted was a CNC machine.
I decided that I wanted to build a CNC machine completely by accident. I was playing around with a piece of nichrome wire, attached to a power supply, and using it to cut paper and then styrofoam. I am not much of an artist, so the things that I was able to cut by hand looked pretty bad. I got the idea that if a computer could control the hot wire cutter, then I could program the computer to cut intricate and accurate shapes. I did not realize at the time that what I really wanted was a CNC machine.
Acquire Stepper Motors
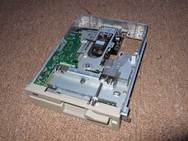
Step 1. Google the topic. The majority of what I found dealt with model airplane enthusiasts, who use hot wire foam cutters to cut model airplane wings. Their set-ups used 4 stepper motors so that they could taper the airfoils. I am not interested in cutting airplane wings, so I figured that I would only need two stepper motors to provide motion in the X and Y axes. One person had used old stepper motors from a printer, so this gave me an idea to use stepper motors from old 5 inch floppy disk drives. Each floppy disk drive uses a stepper motor to position the disk read/write head. Notice the disk drive with the missing stepper motor in the picture above.
|
Pros:
1) Low cost. Free for me, as I had two old drives. 2) Require low current to run. Almost any stepper drive electronics will work. Cons: 1) Motors are weak, low torque. 2) Random size and shape of the motor shaft 3) Random size and shape of the stepper motor |
Build Machine
 Homebrew CNC Machine
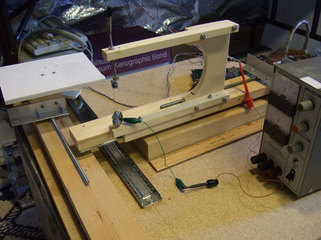
Step 2: Time to build a machine. I used wood. Its cheap and I already owned a hand drill and saw. The base is 2ft x 2ft. On the base I attached a bottom mounted kitchen drawer slider rail. These are a very cheap way to create a linear motion guide. One rail directly on the baseboard and the second rail at 90 degrees on top of a piece of wood attached to the base wood, to give it some height. This height difference allowed one axis of motion to cross over the other. On the raised rail, I built up a wood frame to hold the nichrome wire. The nichrome wire is attached through alligator clips to the power supply in the picture. On the second motion axis, I built a small table as seen as the white piece in the picture, which the piece of styrofoam to be cut is placed on.
|
Pros:
1) Construction material was low cost. 2) Wood is easier to work with than metal. Cons: 1) Can only cut a 4 inch by 6 inch object. Because I gave no thought to the position of the physical elements, they tend to interfere with each other. 2) The machine cuts slowly, because of the number of rotations required to move a given distance. This is a direct result of using the cheap threaded rod. 3) Cheap threaded rod and coupling nut along with my crude stepper motor attachment allow some backlash in the mechanism. |
Stepper Motors
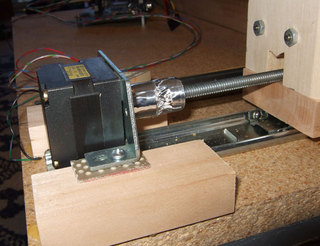
The stepper motors I had were both different shapes and sizes, so custom wood blocks were needed to place them at the correct height. The stepper motor is attached to the screw shaft using aluminum duct tape. The drive shaft is a common threaded rod.
The kitchen drawer slider rail, which you can just see in the picture, is screwed to a piece of wood which moves back and forth with the rail. The wood in this picture holds the small shelf, which in turn holds the piece of styrofoam to be cut.
The kitchen drawer slider rail, which you can just see in the picture, is screwed to a piece of wood which moves back and forth with the rail. The wood in this picture holds the small shelf, which in turn holds the piece of styrofoam to be cut.
Threaded Rod Attachment

This picture shows the opposite side of the picture above. The threaded rod is screwed into a coupling nut, which in turn is pressure clamped to the wood through the aluminum L bracket shown here. The end result is that when the threaded rod is spun, the piece wood riding in the kitchen drawer guide slides back and forth. I used no fancy joints or mountings to hold the threaded rod, its crude but very cheap.
Electronics
The last thing you need is electronics. Most hobby CNC setups are driven by a personal computer. Specifically through the parallel port of a computer. Electronics is needed to convert the weak electrical signals from the computers parallel port into much stronger signals to drive the stepper motors. I had an advantage in this area, as I am a long time electronics hobbyist. I built my stepper motor controller, or should I say I programmed my stepper motor controller in an Field Programmable Gate Array (FPGA) development board that I already owned. I added a small point to point circuit card to the FPGA development board with a ULN2003A (High voltage, high current darlington transistor array) for driving the actual stepper motors. You can always buy commercial stepper motor drivers if you don't want to mess with the electronics.
Thoughts
When I first tested the machine, it did not perform very well. The stepper motors I scavenged where slightly underpowered to move the weight of the mechanism and they would slip at times ruining the designs being cut. I originally powered the stepper motors from 12V, which is what they were rated at. Although I don't recommend this to others, I boosted the stepper motor driving voltage to 15V and the stepper motors no longer slipped or miss steps. The motors do get rather warm, so this would not be a good solution if you are using your machine for long periods of time. I would like to go with stronger stepper motors, but that would require a more powerful stepper motor driving circuit. Stronger stepper motors require more energy, which loosely translates into more operating current. The ULN2003A can only drive 1/2 amp. The higher powered stepper drive solutions would require more components than I would personally want to hand wire together.
The second big issue is the maximum size of an object that I can cut. Currently I can only cut a 4 inch by 6 inch piece. This is a problem because I would like to cut larger objects. In addition when cutting out a shape with lots of intricate detail, the hotwire tends to to melt adjacent detail when cutting very small shapes. Being able to cut larger shapes would allow more detail to be cut and still remain intact. Using larger kitchen drawer rails and better thought of the placement of the X/Y mechanisms would allow larger pieces to be cut. Update: I moved one of the motion axis and was able to increase the motion to cut 6 inch by 6 inch pieces. This is a real improvement.
If you are looking into building your own hobby CNC machine I would suggest you start at instructables.com. Search the site for CNC and you will get many different hobby CNC construction plans / ideas.
